It's amazing how easy the design process can be automated now, but an integrated package has to be well designed and constantly updated or it won't be useful in practice. Equipment and regulatory requirements constantly change, and it is a difficult, if not completely impossible ask for any single program to do everything. Autodesk will have a hard time keeping up in this game short of a complete acquisition somewhere. From an airports perspective the Transoft (Simtra) Airside+ application will lead in airline modelling for some time to come yet in my opinion... and on my workstation.
Showing posts with label Simulation. Show all posts
Showing posts with label Simulation. Show all posts
Sunday, September 14, 2014
Thursday, April 3, 2014
Chilean Tsunami Animation
After many, many years of absolute quiet the Pacific Ocean has been alive with tsunami activity the last few years. The last major tsunami that took lives and caused significant property damage in Hawaii originated with the 1960 9.5 earthquake off the coast of Chile. Waves from that event were up to 35 feet high in Hilo at a time when technology was not as advanced as today.
The 8.2 magnitude quake that struck near Iquique, Chile on Tues, and the 7.6 tembler that struck in the same region yesterday both generated tsunamis. Luckily for everyone outside of the immediate quake area the waves were relatively small. But even these events will roil the entire Pacific basin for hours and hours and create dangerous currents. In Hawaii local officials closed all beaches until about noon on Wednesday to avoid having to rescue the unaware.
The short animation below, produced by the US NWS Pacific Tsunami Warning Center (PTWC) shows quite clearly what happens when the earth moves suddenly like this beneath the ocean surface. The best thing you can ever, ever do if you are near an ocean beach area and feel a strong earthquake, is to pick yourself up and get as far upland as you can as quickly as you can. Waves from the Chile quake hit shorelines within 5 minutes of this event. You don't have time to think! Just run as fast as you can!
Best viewed at the highest (HD) rate your connection will allow.
And the neighborhood has been quite active with aftershocks, including a 7.6 and many 6.0+ shakers since. Having been thru a 6.7 and a 6.0 in rapid succession myself I know how frazzled a persons nerves get after these things... and how long it takes for a body to settle back down. Large earthquakes are downright terrifying.

Monday, March 10, 2014
Office Build Stool Design
I'm already happy with the stand up workstation I recently installed, but from time to time I know I'll want a stool to sit on. Unfortunately drafting stools/bar stool style chairs in the catalogs these days leave a lot to be desired. I confirmed that by looking thru a lot of catalog options this weekend. Basically I found that chairs in this category are, (1) way, way, way overpriced for what you get; (2) cheap looking in construction and materials; and/or even when you find something close to what you might want, (3) it's not built to the size you really need (if you can even find the critical dimensions listed). So it's leaving me but one option: Build my own... an option I should have realized from the outset.
So after looking around for ideas a bit I fired up Google SketchUp tonite (love that little program) and came up with a design very similar to something I kind of liked online. But this one will be sized for my height and the height of the workstation. And since I like quarter sawn red oak, and it makes great furniture, that's the material I'll most likely use. What I came up with is a very simple design using mortise and tenon construction and a curved seat with slats. The short animation below shows what I have in mind. It's hardly original but I like it.
In addition to this I also want to build a "cubby" of sorts for additional table storage eventually. That design will be similar to what might be found inside a roll top desk. But the stool comes first.
Overall dimensions: Leg Base 15 3/4" x 13 3/4". Seat 16 1/4" x 14 1/4". Finish height 32 1/2". About 5 BF of 8/4 and 2 BF of 4/4 material. I usually add a bit for waste and whatnot. Around here it should cost somewhere in the $50-$60 price range depending on what pieces I select. I go nuts in fine lumber establishments... :). But I'll get an accurate tally tomorrow when I see what my favorite specialty wood haunt has in stock.

Exploding these models is always a great help in grabbing dimensions and checking details.
03/11/14 Update on the materials. Sometimes my local wood supplier will have an odd piece of quarter or riff sawn material in the stack, if you're an old lumberyard kid and willing to dig. Since I only need a 7 inch wide stick of both the 4/4 and 8/4 material for this project digging was worth the effort. But all I found was flat sawn boards today, so I special ordered a couple pieces of quarter sawn white oak. I'll get exactly what I want and decided to order enough material to build two stools while I'm at it. It should be here in a couple weeks or so and was less expensive than I expected, all less than$7/BF $8/BF. Still Nice.
Mission Control... as I transition from the old Windows XP computer to the newer Windows 7 rig. What originally looked like a massive amount of desktop real estate is already filled! But it's temporary. Eventually the unit on the far left will go under the table and only two monitors will remain.

So after looking around for ideas a bit I fired up Google SketchUp tonite (love that little program) and came up with a design very similar to something I kind of liked online. But this one will be sized for my height and the height of the workstation. And since I like quarter sawn red oak, and it makes great furniture, that's the material I'll most likely use. What I came up with is a very simple design using mortise and tenon construction and a curved seat with slats. The short animation below shows what I have in mind. It's hardly original but I like it.
In addition to this I also want to build a "cubby" of sorts for additional table storage eventually. That design will be similar to what might be found inside a roll top desk. But the stool comes first.
Overall dimensions: Leg Base 15 3/4" x 13 3/4". Seat 16 1/4" x 14 1/4". Finish height 32 1/2". About 5 BF of 8/4 and 2 BF of 4/4 material. I usually add a bit for waste and whatnot. Around here it should cost somewhere in the $50-$60 price range depending on what pieces I select. I go nuts in fine lumber establishments... :). But I'll get an accurate tally tomorrow when I see what my favorite specialty wood haunt has in stock.

Exploding these models is always a great help in grabbing dimensions and checking details.
03/11/14 Update on the materials. Sometimes my local wood supplier will have an odd piece of quarter or riff sawn material in the stack, if you're an old lumberyard kid and willing to dig. Since I only need a 7 inch wide stick of both the 4/4 and 8/4 material for this project digging was worth the effort. But all I found was flat sawn boards today, so I special ordered a couple pieces of quarter sawn white oak. I'll get exactly what I want and decided to order enough material to build two stools while I'm at it. It should be here in a couple weeks or so and was less expensive than I expected, all less than
Mission Control... as I transition from the old Windows XP computer to the newer Windows 7 rig. What originally looked like a massive amount of desktop real estate is already filled! But it's temporary. Eventually the unit on the far left will go under the table and only two monitors will remain.

Tuesday, January 7, 2014
Significance
I couldn't help thinking of this old Calvin & Hobbs cartoon strip tonite after I'd watched the video below.

Your mileage might vary... but feel free to measure it in "ly" (light years). Proof that none of us are big shots in the real scheme of things.

Your mileage might vary... but feel free to measure it in "ly" (light years). Proof that none of us are big shots in the real scheme of things.
Wednesday, November 6, 2013
Sunday, September 29, 2013
NASA | IPCC Projections of Temperature and Precipitation in the 21st Century
It's far too late now to argue anymore about who may be to blame for this. It may also be almost too late to start planning for it. But denial is surely as useful as saying the sun won't rise in the morning.
Thursday, August 8, 2013
Monday, February 4, 2013
Tablesaw Router Station Build
Right up front I have to say that this idea wasn't an original one of mine. The key piece of information came courtesy of a guy named Derek over at the Making Splinters blog. Without his discovery of the cast iron surface none of what follows would have been possible! So mahalos to you bigtime, Derek! :)
Monday, January 28, 2013
Custom Fence
I'm currently in the process of modifying my table saw again. The new Excalibur #40-070 cast iron surface wing with an insert for a router plate, and a new Jessem Mast-R-Lift II to install with it have arrived. This past weekend I built a few custom "bench beams" (below) to act as a third hand support system during dis-assembly and installation. That work will be documented here once I get on with it. But over the last couple of nights I've been working on the design of a custom fence system to compliment the setup.
Router fences are completely different than table saw fences in both use and function; they're actually much more like sacrificial dado fences, so for everything to work properly in the new setup I need to come up with something custom for my equipment. Nothing "off the shelf" is going to work unless I completely replace the table saw fence. And that I'm not going to do even as much as I might like a new Biesemeyer table saw fence system! At least not now.
The video above shows the design I came up with for my system. It's a compilation of ideas found on the internet, custom systems for sale, and the basic router table fence built by Norm Abrams of the New Yankee Workshop many years ago. The drawing work was prepared using Trimble SketchUp 8 and the video captured with Techsmith's SnagIt 11.
A couple items I inadvertently omitted in my narration of the video include the fact that the main anchoring section (the dark brown piece) gets clamped to the cast iron surface to keep the system locked in place. Most router table surfaces have slots cut perpendicular to the feed direction to allow in/out fence adjustment. Unfortunately the Excalibur surface does not have these slots, so my design makes provision for that using the dark brown base design shown here. Also, T-bolts, washers and wing nuts will be used to connect sacrificial and other facing pieces onto the main assembly. If it turns out that unfinished Baltic birch isn't smooth enough for efficient use I'll replace them with pieces fabricated using melamine.
As noted in the video, comments and suggestions are always welcome. If you see something that looks like it could be improved I'm wide open to hear your ideas.
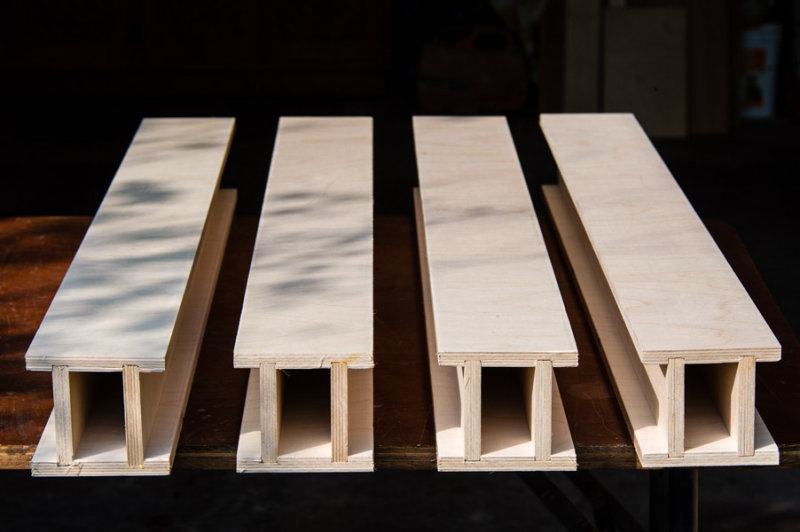 |
| Bench Beams 4"x4"x36" - 1/2" Baltic birch |
Sunday, August 5, 2012
Curiosity
Is this all far too complicated, or not? We'll see. Mars has not been an especially good host to Earthly visitors in the past. The latest chapter is about to be written.
So be sure to watch the evening news tonight. One way or another *something* is going to happening way out there today!
UPDATE: Curiosity Has Landed! As crazy as the idea was the nerds at NASA made it work!
Monday, February 13, 2012
Simulations - Partie Deux
Some of you may have seen a previous version of this simulation. (If not, go -Here-.) That earlier one showed conditions during construction. But during a pre-construction meeting recently it was suggested that I create another simulation showing how things will work once construction is complete, and verify that the airline will be able to drag the number of carts they did previously (4). So this was it.
From this we see that the airline should be able to make all the turns again with four carts. It will be close, but according to the software they'll be able to make it.
I can say that I will be as interested as anyone to see how accurate this software performed! This is the first best test I've ever put it through!
Friday, January 13, 2012
Simulations
Every now and then something comes up where I get a chance to exercise my AutoCAD and Simtra PathPlanner chops all at once. Today was one of those days.
This reminds me a lot of "The Little Engine That Could", but it wasn't done just for the fun of it. It proves we can build a temporary construction fence for some pending work and not get in the way of air carrier bag claim operations. The Simtra software has a great inventory of aircraft, ground service vehicles, and loading bridges, and makes this kind of stuff a snap to put together.
The video is best viewed full screen at 720 HD. It comes out a little brighter that way.
Updated: 01/13/12
Subscribe to:
Posts (Atom)