 |
| 27-Dec-2012 (KOA) |
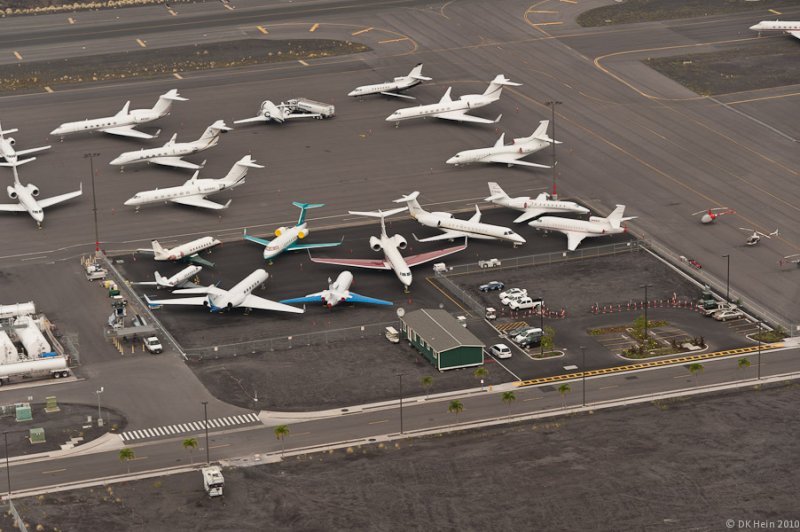
Yesterday was the day once again for an annual aerial
photo flight at Kona. I’ve gone up
every year between Christmas and New Year’s since 2004. In the beginning these flights were only done
at Kona to capture the crowded conditions we see on the ramps during the holiday break. Eventually a separate
annual flight was scheduled at the Hilo airport too and the photo library became a
useful tool for recording conditions and changes over the prior 12 months at both airports. We also learned how to leverage the pictures for reports or whenever a case had to be made for project needs.
Images really do trump words every time.
Taking photos out of a small helicopter is not a trivial
exercise however. In the years of doing it at Kona and Hilo I've learned a few things. Let me
rephrase that: I've made every mistake in
the book! These were lessons learned the hard and expensive
way - the kind you tend not to forget. Helicopter
rides aren’t cheap and on a photo flight
there is a lot to do in a very short time (usually 30-45 minutes). It all happens
very quickly so if you mess something up or don’t
get the assignment filled you wait a year for the next chance! Yeah, ouch.
 |
| 28-Dec-2012 (KOA) |
The goal each year is always generally the same: get the shots, get them sharp, nail the
exposures, and try to not fall out of the helicopter. There are no doors on the Robinson 22 training
helicopters used for these trips, and that’s both good and bad. The good means visibility is almost ideal –
you still need to try and keep rotor blades out of the shots. But the bad means it can get nippy
up there even in Hawaii. And with the wind blowing if you lean out too
far it can be all too easy to see something ripped out of your hands from the rotor wash. Think camera if nothing else.
So there’s all that - easy enough stuff - but let's get into how
to set a camera up prior to even going out on an assignment like this. There’s more to think about, consider, and
watch out for than you might realize.
I shoot with a Nikon D3 body so the descriptions here
will primarily be for Nikon gear. but if you shoot
Canon or some other brand your setups will be about the same with
slightly different terminology. The translations should be fairly easy
however if you're up to a gig like this.
 |
| 28-Dec-2005 (KOA) |
I use a 28-300mm f/3.5-5.6 VR lens on these trips because
it provides great range from wide to long and also because there is really no time to change (or risk
dropping) lenses while you're up there. In
Nikon-speak VR stands for Vibration Reduction.
Canon calls this an IS or Image Stabilization. The idea is the same regardless of acronym
however. They all contain a built-in motor
that adjusts for camera movement to get sharper
images. The lens manufacturers generally
claim that VR (IS) lenses provide an extra stop or more of speed since
you can shoot at lower shutter settings than with a non-stabilized lens. Personally I've found these claims a little ambitious at times. But that's just me.
What follows then is a discussion of what I've learned and how I set my rig up
the other day. In retrospect this has been
refined over the years to a point where it’s much more than I realized at
first. Without overstating the obvious a
helicopter is a wildly vibrating platform to shoot from, and if you don’t
take photos with a high enough shutter speed there’s no way to ever get sharp
images. Lesson #1 then is to set up and shoot in Shutter-Priority mode. In my
case I set a shutter speed of 1/1000 of a second to expose every image at
1/1000s and vary the aperture setting accordingly. It turns out however that often even this isn’t
enough to guarantee consistently good images.
 |
| 28-Dec-2010 (KOA FAA ATCT) |
 |
| 27-Dec-2012 (KOA FAA ATCT) |
When you fly and photograph early (or late) in the
day you will eventually face in every direction possible with respect to the sun. Sometimes the scene in front of you will be bright, other
times dark, and the rest of the time everything in between. In many darker cases 1/1000s exposures can
be too fast for a lens at its widest available aperture (whatever that might
be). Lesson #2 is to set the ISO
Sensitivity Auto Control On with minimum and maximum ISO values. This allows the camera to adjust the ISO value
up as needed for a proper exposure. ISO
Sensitivity Auto Control will always default to your minimum ISO value and adjust
as it needs to. In my case I set the ISO
Min=200, and Max=3200.
Good so far but we’re still vibrating and shooting from a
moving platform. This is where a VR (IS)
lens comes in handy. All of what follows can be called Lesson #3. Most VR (IS) lenses will have three (3) switches;
the first is for M/A (manual/auto) auto focus, or (M) manual focus control. Manual focusing would be crazy in a
helicopter – so set auto focus on. The second switch is for vibration reduction itself, so turn VR (IS) on. And
finally, the lens may have a switch to control whether the vibration
reduction motor performs normally or is active.
Normal mode is used most of the time where you are standing still and the
only motion the camera sees is coming from you.
Active mode is for shooting out of moving objects like gyrating helicopters. It’s a more aggressive adjustment designed
for just this kind of environment. Set VR Active. And a side note is worth mentioning here:
if you shoot a VR (IS) lens off a tripod always remember to turn VR
off! Leaving VR (IS) on in when a
camera is perfectly still will actually introduce movement into the photos! That motor just assumes it has to do something, so it does. Yuck, I’ve made this mistake enough times too.
Lesson #4: set Auto focus (AF) mode to
Continuous. This lets the camera
track focus on whatever you lock it on for that brief time between when you frame
and focus on a shot and actually fully depress the shutter. It might seem like you couldn’t get that far
out of focus from so high up… but trust me, if you’ve zoomed out to 300mm and
don’t have this set you’ll appreciate continuous tracking! Everything is moving from up there. This is a trick worth pulling out of the bag if you're in a helicopter.
 |
| 29-Dec-2005 (KOA) |
And finally Lesson
#5: shoot in camera raw
mode. You really don’t have a lot of
time to shoot much more than a couple thousand images in 30 minutes so your memory
card isn’t going to fill. But more
importantly the raw captures will give you maximum editing control later on when it comes
time to make adjustments to the images.
This kind of photography is just too important and too expensive to
throw a single pixel of information away.
So don’t. Shoot in raw mode and toss the rejects later.
Now that the camera is set up properly you're ready to go. Buckle up and try to remember the full shooting assignment, tell the pilot where you need
to go, don’t drop any of your things, have fun, and don’t fall out of that gaping hole
next to you. It’s pretty simple really…
and will be over before you know it. One way
or another the results you get will have to last for another
year by then anyway.
 |
| 28-Dec-2009 (KOA) |
Good Luck! The
presentation is due when?!
WOW, another reason I NEED a point and shoot! Great pictures and a tip or two even I might be able to use! Was up in a helicopter once while stationed in Iceland and took some pictures, a real thrill, I have the photos in a box somewhere, maybe I might scan a few and post them, after I shovel the drive of course! :-)
ReplyDeleteDo you shoot both airports on the same flight?
ReplyDeleteKona and Hilo are 100 miles apart... so the aerial photo tours are scheduled on separate days using different helicopter companies.
ReplyDeleteGreat article Dave!
ReplyDeleteAnd very accurate tips, most of them is common sense, but when you found your self up there, common sense is not so common suddenly...
Thanks for sharing!