Showing posts with label woodworking. Show all posts

Monday, January 22, 2018

Tool Derusting with White Vinegar


This is a trick/technique I wish I had learned years ago... but if you have a shop with old tools, or you pick up some (new to you) tools at a swap meet or yard sale that are rusted but still look usable, save some elbow grease and gleam them up this way. It's inexpensive and fool proof. I wish I had taken a few photos before starting this, and may add a few to this post later, but the results are already beyond impressive. The vinegar strips off the rust and leaves a like new finish on corroded areas like a champ. In only a few days you can reclaim parts or tools that looked hopelessly lost. Simply rinse things off when they come out of the bath, dry them, and add a liberal coating of WD40 and you'll be good to go.

Enjoy!

Monday, January 16, 2017

Saturday, August 2, 2014

The Fletcher Capstan Table

Amazing. You may have seen the animated GIF of this before, but this was the first time I have seen how the entire table is built.


It's as much an engineering marvel as it is a woodworking treasure.

Friday, August 1, 2014

Friday Night Movie

The Gentleman's Valet by Tom Fidgen of the Unplugged Woodshop; Part 9, the final video.


Friday, July 18, 2014

Porter-Cable 7518 Router Base Recall


Well, Porter-Cable really is taking this router base recall thing seriously. My replacement base (the one on the left side of the photo above) arrived in the mail today! I wasn't expecting to see it until the end of next month! The base on the right was never actually used in a hand-held mode because I originally purchased it for use in a portable router table. Now the motor unit lives in my table saw lift station. But it's nice to know that the whole kit can be used hand held or resold at some point as a completely safe item.

In case you're just reading about this for the first time be sure to visit the US Consumer Product Safety Commission's webpage concerning the Porter-Cable Recall and submit your information for a replacement as soon as possible. Porter-Cable recalled these bases early in July 2014 because the uninsulated handles present a potential shock hazard. Routers are inherently dangerous power tools to begin with, but the idea of getting electrically shocked while using one kinda makes my skin crawl. Once you get your new part throw the old one in the trash and send in the postage paid "Recall Corrective Action Acknowledgement" card. The new bases come with a new base plate, so you'll have an extra if you save the original. You can save the locking screw from the old one too before throwing the rest away. Just be sure the old base gets into the landfill where it can't zap anyone ever.

This recall affects all of the following: Porter-Cable 7518, 7519, 7519EC and 22-7519-60 Routers, 75361 base units; and the DeWalt DWP7518 Router.

Safety First out there!

Wednesday, May 28, 2014

Wordless Wednesday

Inspirational. Watch the whole set if you have time.


Tuesday, May 27, 2014

Office Build Stool II

Mortise layout on legs
Now that my mortising machine and tenon jig are all set up and working it was finally time to get back on this project.  The parts had been milled long ago (as in early April!) and have now been fully acclimated in my shop, so last night I laid out the mortises on the legs.  Today work on the build really got started.  Since pencil lines don't show up well on oak in the low light of my shop (translation: my eyes aren't as good as they once were) I used the idea of laying everything out on tape and then cutting the target areas out.  This did take extra time, but it worked pretty nice actually.  I should probably get some white pencil lead before the next project however.

Making oak chips
There's a reason you need to keep mortising chisels sharp: plunging cuts in oak is hard work!  If you've never used a mortising machine you might be surprised at how much force is required to cut a half inch square hole in solid oak.  My machine is heavy (93#) but I still felt a need to clamp it onto the workbench when it wanted to tip at times.  It made quick work of the 16 mortises on the legs however, and with a little cleanup in the bottom of each hole machine cuts like these are amazingly consistent.

Step 1 - Set the tenon width
I did the first part of the tenon work on the table saw by nibbling away at the edges of the pieces to set the tenon width.  This takes a little longer than cutting them on the jig but it gets this part out of the way right up front.

Step 2 - Make the cheek cuts with the tenon jig
Then I cut the tenon cheek cuts with the jig.  I started with real fat cuts on the first piece until the fit was just right and then cut all the rest.

Step 3 - Cut the shoulders on the table saw
The last step to complete the tenon was to cut the shoulders on the table saw.  You might note that I'm not staying with a more "standard" tenon size here.  Normally for 3/4 inch stock the tenon would be half that, or 3/8 inch thick.  But because four of the stretchers on this stool will likely have my feet resting on them a fair bit of time I decided to oversize them.  And rather than change the jig I used the same setting for the aprons.

Oops!!!
What's a project without at least one oops?!  This is what I get for leaving my plans in the house.  I had everything milled and didn't discover a problem until the dry fit.  Ouch.  So four of the pieces had to be cut shorter and the tenons redone.  I think I wrote somewhere the other day that my plans usually go out the window after the first cut and then everything else becomes relative.  Well, this project will be no different I guess.  :)

Dry fit
Everything went together pretty well.  I've done a little fitting and tuning here and there, and a bit more is left, but overall I like how the base fit together.  In the photo above you can see the seat pieces sitting loosely on top.

It was nice having a long holiday weekend to get out in the shop like this for a change.  Time flies out there!

Foot rests/stretchers
I'll use this stool at my office stand up workstation.  As much as I like the new setup there are times during the day when I want to sit for a bit ... and this will keep me out of the old plush chair and up at the desk where I can continue working.


Sunday, May 25, 2014

Tenon Work

Jig in Test Mode

In Nov 2009 (I know because I wrote the date on the assembly instruction papers) I purchased the beautifully machined tenoning jig above. I'd have to go back in time to see what it was I was building then that made this purchase so "urgent", but whatever it was it turned out that I never actually put it together or used it. In fact, all this time the box has been in near pristine condition under my bench gathering dust. With the recent purchase of my mortising machine however it became clear that tenons to match only make sense, so it was finally time to break the assembly embargo and put this thing together. And doing so turned out to be a perfect rainy Saturday afternoon project.


I had a minor bit of trouble however. The miter slot runner was installed by the factory in a location that made it impossible to move the main fence all the way to my saw blade. So it needed to be relocated to an adjacent position.  Unfortunately the allen screws that secured it were frozen tight! I almost got to the point of drilling them out before finding a couple suggestions online about how to free bolts like this. One idea I would have never thought of involved using a torx head screw. But the method I eventually used (all ideas included penetrating oil and a good deal of hammering) was using a hex key in a ratchet wrench. When an allen screw is in really tight a little "L" shaped wrench isn't going to get it out. The extra leverage of a wrench however is much better. Once I got them out (without stripping no less!) it was a simple task to move the slot runner and proceed with setup.

Handle locations keep the operator safe

The key setup checks for any tenoning jig are to make sure that, (1) the main fence is perpendicular to the table saw table; (2) the support fence behind the workpiece is perpendicular to the table; and (3) the entire assembly moves parallel to the saw blade. For most typical, right angle joints, these relationships are critical to a perfect joint.  A custom jig like this also allows for more complicated angled cuts.

There are a variety of ways of creating a tenon. The simple way, and the way I've made them in the past, is to use a dado stack on the table saw. But this has a couple of disadvantages. Mainly it's quite slow, and if you have a lot of tenons to cut it gets a bit tiring. But a more important reason has to do with quality. Dado cuts can produce a rough surface on the cheek of the tenon and to get that cheek smooth means more time and work. Cutting tenon cheeks on the table saw however produces a smooth cheek with little need for added dressing. So using a dedicated jig increases both productivity and accuracy, and throws in high quality as a bonus.

Operator's view.  Shows the relocated miter slot runner.

Using a jig for tenon cuts also makes the process very safe. The handles guarantee that the user's hands will be well behind, above, and to the left of the cut and any flying pieces. And the supports and clamp ensure the work piece remains secure. Once the jig is set up to create a good fit numerous pieces can be prepared with confidence.

I have a fair bit of mortise and tenon work to do on my office work stool project, and on a printer table to follow that. Considering that I like making Shaker and Mission style furniture the new machine and this jig will probably see a lot of use in the future. Like anything in this craft there's a learning curve whenever you start doing things a new way.  These two new pieces of equipment are capable of producing superb results, and my tests today proved that I can get them.  There will be a few more things to be figured out yet, and probably a few mistakes.  But I'm looking forward to getting up and running.  Mistakes and all.  :)

Monday, April 28, 2014

Shaker Step Stool

I know building these was hot about a year ago.  I finally put the finishing touches on mine tonite.  The last bit of oil and wax went on and now it's into the box... as soon as I get the cat out of it.  Tomorrow it will begin a long airplane ride across the Pacific and then the US mainland to its final home in NY as a gift.

The design is Shaker (ala Tommy MacDonald), but this one was made using mahogany.  The finish is Watco Danish Natural and paste wax.  It's nice and light yet very strong.  It will be just about perfect for its petite, and vertically challenged recipient. :)


Sunday, April 27, 2014

Easter in the Shop II

I spent the past week tweaking the drawer dividers I built last weekend... and finishing the "finishing" work. My original idea was to put the color on, distress it a little, and cover it with a coat of clear lacquer as protection. But tonite when I hit the button it turned out I hadn't bought clear after all! I had black!!! Arf. But lemonade is made out of lemons... so I went with the idea. And I think I'll keep it. As it gets beaten up over time the character will only improve.

... or I'll build it all over.

knife partitions


silverware side

Sunday, April 20, 2014

Easter in the Shop

Today I sacrificed a bit of daytime sports tv and made a mess in my shop. My kitchen drawers are part of a mass produced, and frankly not very well built, set of cabinets. And I've never been happy with any of the drawers. The sliders aren't full extension and the overall workmanship is just garbage. I should rebuild the entire kitchen! But short of that I have long thought about doing something to organize the silverware and knife drawer. This is the one I use the most and is the one I've hated the most for a long time. Nothing about this drawer is square, or plumb, or even equal. It's hard to see here but the divider wasn't even glued in plumb, centered, or square to the front!


Stuff slides around in here ... and it's driven me nuts! So it was a perfect opportunity today to put my new little finger joint jig to work. I had picked up some 1/2" thick hemlock the other day and today I milled it down to 3/8" thick and then cut fingers on them to create boxes that would custom fit my crappy drawer compartments. The thickness of the stock was sized so I could use the same 3/8" setup to mill the dados for the dividers. Right now I've left it all as a friction fit because I ran short of stock. So before I finalize it, glue it up and put paint on this I might grab some more material and add a couple extra dividers somewhere.


But this should stop all the rattling around and humbug of the last 10 yrs! And if it doesn't I'll just tear it up and build it again. I can see all sorts of handy uses for my finger joint jig already. It's no wonder my Pop loved them so much.


I also made a simple little Tommy MacDonald-inspired dovetail layout and paring block today. It's made of white oak for 1:6 pins. It was pretty amazing how much of a mess these two little projects created today!

Tuesday, April 15, 2014

Box Joint Jig V (Arbor Mods)

I've only had time for short appointments in my shop lately, but with each trip something still gets done. The other day I took the table saw out of service to finish the arbor mods. This is where I used JB Weld as suggested by Michael Olsen to fill in the threads near the inside plate so that stacked blades wouldn't fall in the gap and result in poor cuts.

Here I've masked the arbor threads off before slobbering a bit of the weld material where needed.

Once it set up enough I tore the tape off and let it sit 24 hrs to harden. Tip: If you live in a humid climate like I do *never* do epoxy work late in the day or evening! I've learned this lesson the hard way. Night air and humidity will prevent the mix from ever setting up no matter how well you've measured. I had no problems with this mix, everything came out fine.

And then sanded it down and carefully tested the fit with a blade. The results speak for themselves. There is no more offset cut with the Freud Box Joint blade set. They'll stay with the inventory. :)


Both of these were cut in the 3/8" setup with the Freud blades that gave me so much trouble initially.

Now I can get back to my regularly scheduled programming mistakes projects! (Mistakes - like fixing that copyright watermark in Lightroom! Sheesh!)

Saturday, April 12, 2014

More Power... Arrr, Arrr, Arrrrrrr

Yup... 220, 221. Whatever it takes. (Kudos to those of you who know where that line comes from.

It all started when my neighbor banged on my door at 8:00 a.m. this morning, ready to go. Normally Saturdays I catch up on a lot of the sleep I let get away from me during the prior week. But today I had to fly out of bed, grab some pants, and see who was making the racket. I knew already... just didn't expect him. This was going to be the day we did the work to allow me to switch my table saw from being powered up by this:

120V 15A Outlet (old)


to this:

240V 20A Outlet (new)


On the top is my original 120V, 15A shared outlet that I have been popping the circuit breaker with using for the table saw since forever. On the bottom is the new 240V, 20A dedicated outlet that the saw (and hopefully sometime in the future a bandsaw) will be using from now on.

We started by trying to figure out how to run the new line. It would have been nice if we could have run the wire in the wall, but with the new building codes that require fire break blocking between the studs it was no go. So I decided we would just run a conduit down on the outside of the wall. And it seems perfect for the circuit. I may not even paint it.

The worst part of the job was fishing a pull line from the ceiling down into the panel box. It was complicated because there wasn't much room in the box and the working space up in the ceiling crawl space was extremely limited. But we made it work with a minimal amount of foul language. Once that was done we were home free, and ready to confirm the materials list and head down to town to both Lowe's and Home Depot to pick up all the materials.

When the new circuit work was done we rewired the motor in my saw and installed a new power cord. It works great now! The real proof will come when I get my next chance to rip some 8/4 oak. No doubt it's going to be just fine.

Oh, yeah... and my neighbor? He is a licensed electrician. So I know all the work has been done correctly, safely, and perfectly to all the codes and requirements. It's really handy having great neighbors like him!


More power... arrr, arrr, arrr! :)

Thursday, April 10, 2014

Shop Update

I mentioned three things here a couple days ago and showed none of them. So for the two or three of you who read this we'll get you caught up.


It's a shame there isn't a "before" photo of what this table looked like before I started sanding last night. But at this point it's starting to look pretty good. There are still a few spots of white paint in the grain that I'll have to get out with some stripper, but as of this point I'm pretty much done sanding. I actually used this as an assembly and work table for a while in the early days. But for the last many years it's been upside down collecting dust and miscellaneous clutter. I'm not exactly sure what it was made of, but whatever it is the termites have completely left it alone all this time. And that's a good thing for sure. It will be nice to get it refinished and out of here since I really have no use for it. And with the time I've now invested it's surely worth more than it was a couple days ago.


And then there is my first little (as yet not completed) finger joint box. All I did on this tonite was flush the pins. Never made it to the store to look for hinges or clasps today... maybe tomorrow I'll remember. But it suits my mortise chisels and the little diamond sharpening cones for them perfectly. Made this of poplar.


Finally there is the future home of my new mortising machine... still in its original box... and the benchtop that is now free of an upside down table. I'll get to assembly of the mortising machine this weekend for sure. By then all the mortises should be laid out in the stool pieces.

Tuesday, April 8, 2014

Office Build Stool I

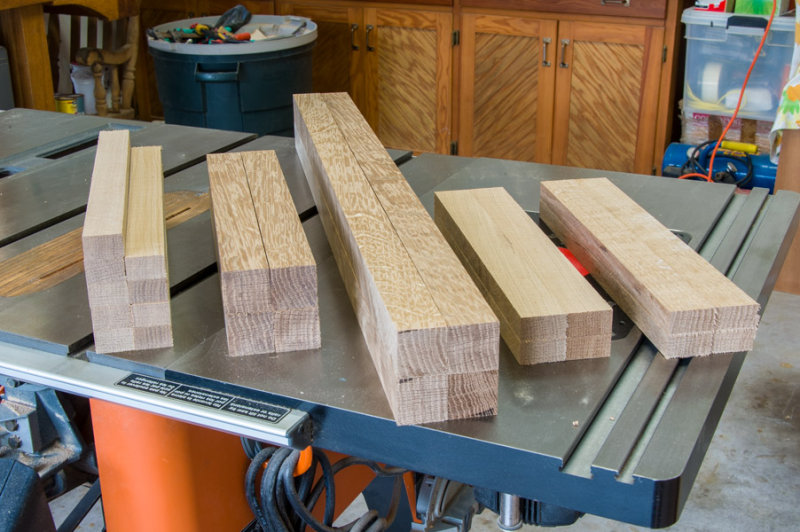
I was sore, sore, sore all day today. The quarter sawn white oak drafting stool build has begun. It took a couple of weeks for the material to arrive, and that delay is always built in and expected. This past Sunday I brought a rough cut 2x8x10 and a 1x10x12 down to finish dimensions and all the lugging back and forth reminded me that I have back muscles and hamstrings! :) Solid oak is heavy! Last night I milled the basic seat, leg, apron, and stretcher parts as shown below but it didn't loosen me up much. Getting old is a beach.


Tonite I felt like I didn't do much, but actually did. I cleaned off a bench that has had an old table on it for years... and the clutter that went with it. I need space to set up a new Powermatic PM701 bench top mortising machine! So something had to be done about the clutter and this table because there's no where else to set up the mortiser! I've debated with myself for years what to do with that old table... stash it under the house and forget it, throw it away, give it away, or clean it up and sell it. Tonite I put several hours of elbow grease into cleaning it up for refinishing and eventual sale. When I'm done I'll just sit it in my driveway with a price tag on it and the first one to walk in with the cash will take it. :) I'll get a photo of it up here eventually. But the process is in full swing. I'll probably feel tonight's effort some time on Thursday.

And I glued up a little finger joint box that will house my mortising bit collection. No photo of that yet either, but I decided not to waste my first set of finger joints. Once I'd dialed the fit on the test pieces I sized it for a box that could actually be used for something. More on this later. I'll work on finishing up the top and bottom this week and look for some inexpensive hinges and hardware.

I'm taking time with the stool because I've also been tweaking the design a little bit. This is one of those builds where the design is somewhat organic in that I don't really have a plan to work with because I'm designing it as I go from something I saw somewhere online. It's not how I'm used to building things. :) One of the details that bothered me about the online design was the thru dado in the seat frame. I didn't like the look of the joint on the outside of the frame and it felt a bit lazy. So instead of routing it thru the full length of the frame as shown in my earlier video I've decided to connect the frame with mortise and tenon joints. I'm still debating the groove with myself... but for now, this is the direction I'm headed with the seat. My original design idea was posted a while back here.


Oh... and the other thing that came to light (again) the other night is that I need to pull a 220V circuit into my shop! Bigtime. My little 15A circuit struggles with ripping 8/4 oak and I'm sick of messing with it and resetting the breaker. So my neighbor, who is a licensed electrician, is going to help me install a new 220V outlet and rewire the motor on my saw. This will also set me up to purchase a band saw at some point already wired for 220. More power is what I need... arrr, arrr, arrr... more power.

Saturday, April 5, 2014

Box Joint Jig IV

Problem solved! I tinkered with the new Freud Box Joint Blade set again today and realized exactly what the issue is. It's not the blades at all - its the arbor on my table saw.


Either by design or by wear over the last 10 yrs or so the inside (left side on the photo above) of the arbor screw threads have worn down and created a slight drop next to the solid 5/8-inch diameter section. The solid portion is about 1/6-inch wide... suitable for a thin kerf blade. But if you put a second one next to it, like the new Freud box joint blade, it "falls" into the gap... just far enough to cause a loose fit and the 1/32 inch cutting differential I was seeing. I suppose I could look into replacing the arbor, but from fairly recent experience I know what's involved with taking this saw apart... and it's quite a chore. For the sake of cutting box joints with a custom set of blades that idea is an immediate non-starter.

So nuts to it. I put on my old Freud dado stack and set them up for a 3/8-in cut. Perfecto! They are little bit noisier than the newer blades but they work just fine. And for whatever unexplainable reason they do not fall into the gap like the newer blades. I think it's because they are a little bit wider and span the gap enough. At any rate the tops of all the cuts are clean with these blades, and that's what I want anyway. I did learn that every new set of joints, once the setup has been dialed in, requires a fresh new backing plate. I'll go thru a lot of these over time.


So I'll save about $100 by returning the newer Freud kit and using my old dado stack. The savings will probably get spent before my account even gets credited!


I have the option of using this with my router station setup as well. The miter sled inserts work for use at both the saw blades or at the router. This is a bit of dumb luck because I didn't check it the other day before installing the inserts. There will be a minor bit of trimming the first time I use it at the router, but after that it'll be good to go. Cool.

I'm already wondering where I'll use it most often and somehow I think the router might produce the best results. To prove it I just ordered a nice new set of carbide spiral bits ... been wanting a few of those anyway. See... savings almost gone already! :)

Post Script: Thanks to a great tip by Michael Olson I may hold off on returning these blades after all. Michael had the same problem and posted an in situ modification using JB Weld in this video on YouTube. If my local Home Depot or Lowe's has some of this stuff I just might give it a shot! Thanks, Michael!

You've got to hand it to the interweb these days... just about all the answers are there somewhere!

Box Joint Jig III

The new box joint jig is done! I finished it last night. But it was too late then to do a posting, so I'm doing it now and adding a couple of extra notes after a day of thinking about it and tonite's tests.


Last night was all about completing the adjustment section. This involved drilling holes in the end grain of the fence and one of the sliding adjustment pieces and then assembling the hardware to make it all work.


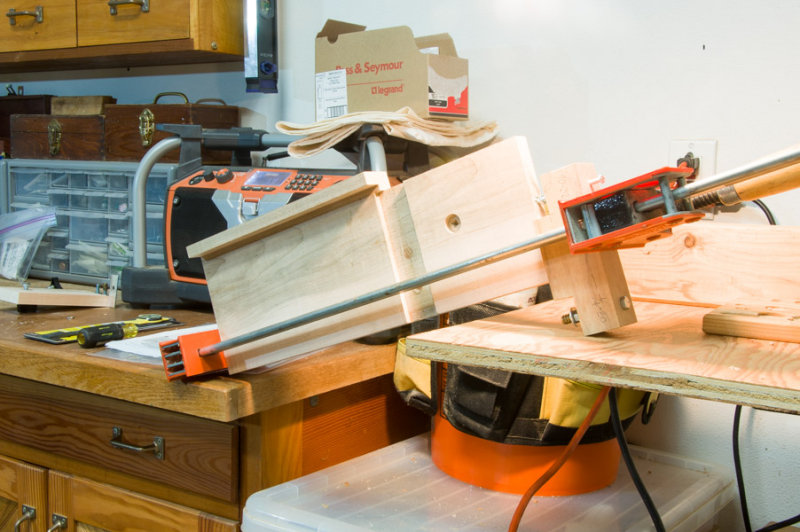
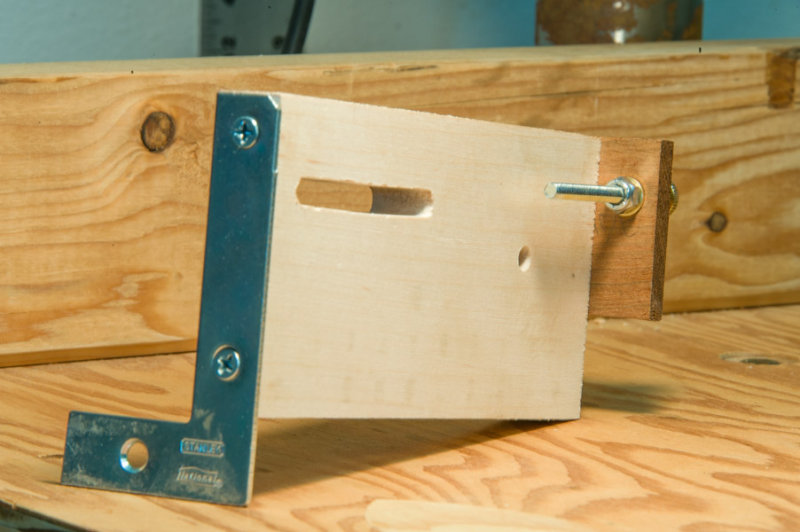
Drilling for the adjustment screws had to go a full 2 inches into the end grain. Doing this on the short adjustment piece was easy to do on the drill press. I used the little right angle support I made and clamped everything down. But I couldn't do the same thing on the fence because it's too long and my bench top drill press doesn't have the length. So I had to improvise. Eventually I came up with the idea below to "sandwich" a pre-drilled block on the end of the fence with a couple support pieces on each side. I put the whole thing in the clamp on my bench and just took a shot with a hand drill. It actually came out straighter than the the hole done on the drill press!


I used a brad point bit and aligned it before securing the block. Then I just went for it. :) No guts, no glory they say. I used this same idea long ago when drilling holes for my futon sofa. So I knew it would work.

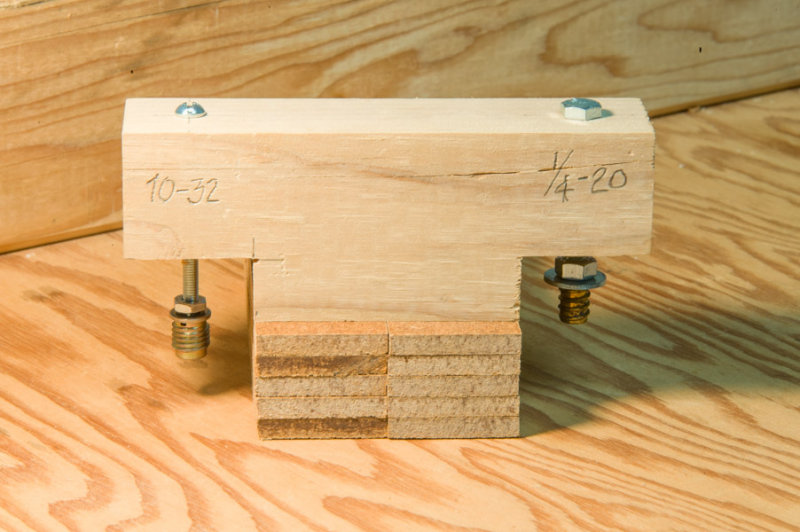
Then it was time to install the threaded inserts. A lot of woodworkers have trouble with these because they do have a tendency to follow grain and get crooked. You definitely can't install them free hand. You need some method of keeping them straight. Some folks will use the drill press. But for years I've used a simple little wooden block idea I found somewhere. All it is is a pre-drilled hole with a bolt and nut that secures the insert and keeps it completely vertical. Then you just screw it in. I like to wipe a generous portion of paraffin wax to lubricate the screws no matter what. And that helped installing these in hard maple. I didn't even use the jig to install them the full depth either. Once they were about halfway in I finished up with a large screwdriver.


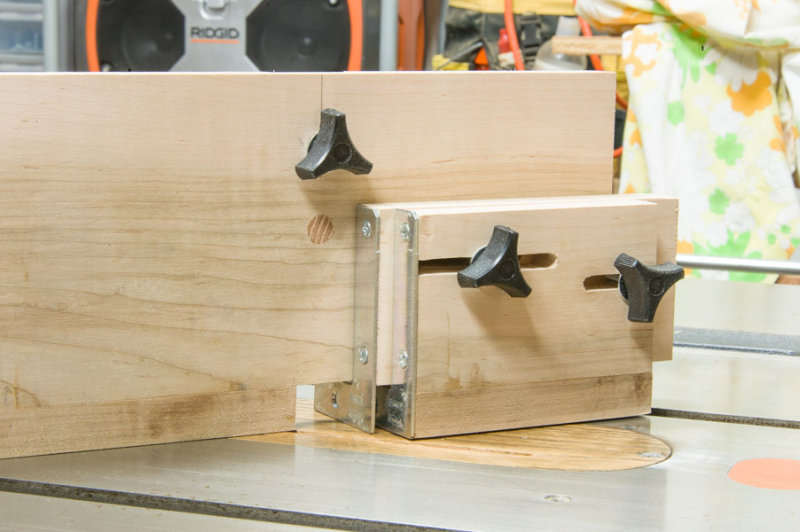
The inserts for the adjustment screws used the 10-32 side of the jig. The 1/4-20 side was used to install the inserts that connect the system to my Incra miter slot sled. The fence section again called for a little innovation. I clamped everything up in one of my cabinet clamps and drove the insert home.


But the worst part of the night... and the longest... involved installing the hardware on the adjustment end cap! On the back of the cap the screw is secured in position with a lock nut and washer. On the front is a washer, nut, and knurled knob. It took for-freaking-ever to screw the lock nut the 2+ inches up the threaded rod given the short work space. And then it took me a while to figure out how to lock everything down so it wouldn't just rotate the rod and not move. This one of those things that involves a lot of trial and mostly error. By the time you get done it's easy, but by then a couple hours have miserably passed.


I was so happy when this part was done. Now, I thought, I can put this thing together! It's getting late! Hold on, Cowboy! Not so fast. It wouldn't go together without backing out the lock nut on the outside screw! There went another hour. But even that ended. It was 11:00p. I never thought what was left would take this long!

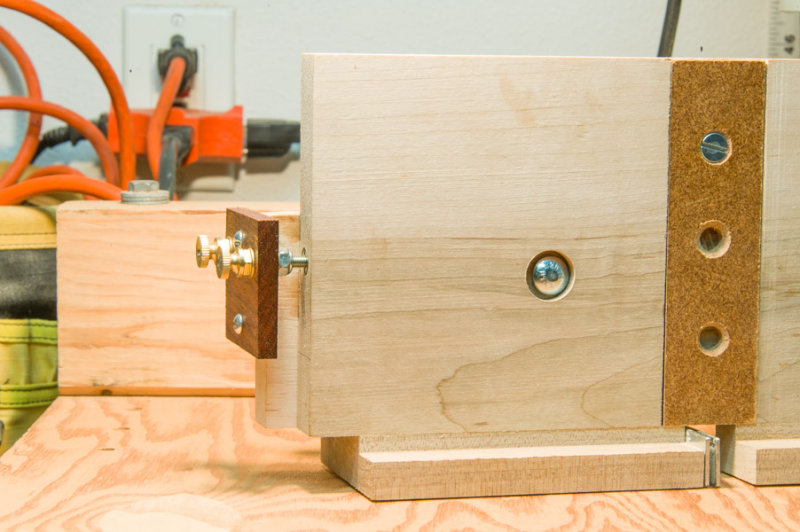
The fully assembled and installed adjustment 'engine'.

So with that all done, I cleaned up and went to bed. Tonight I drilled and installed a pair of inserts on the back of the box joint jig fence. This will let me take the rig on and off my Incra miter gauge using machine screws and not mess up the wood over time with wood screws.

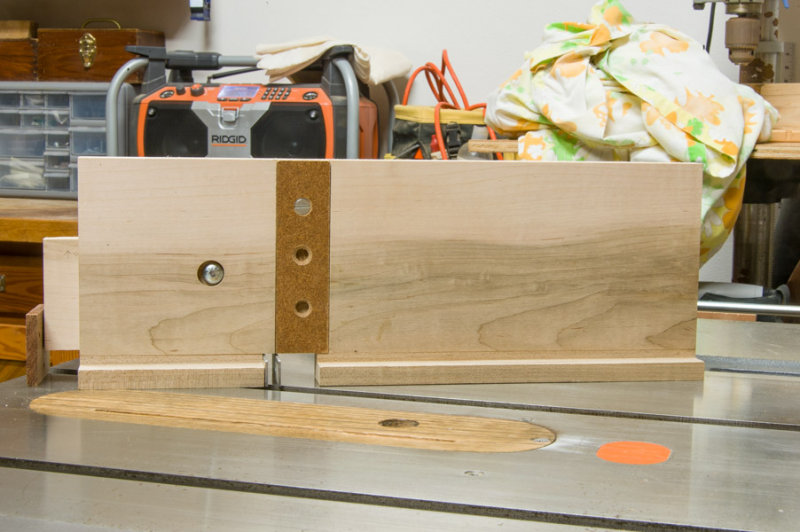
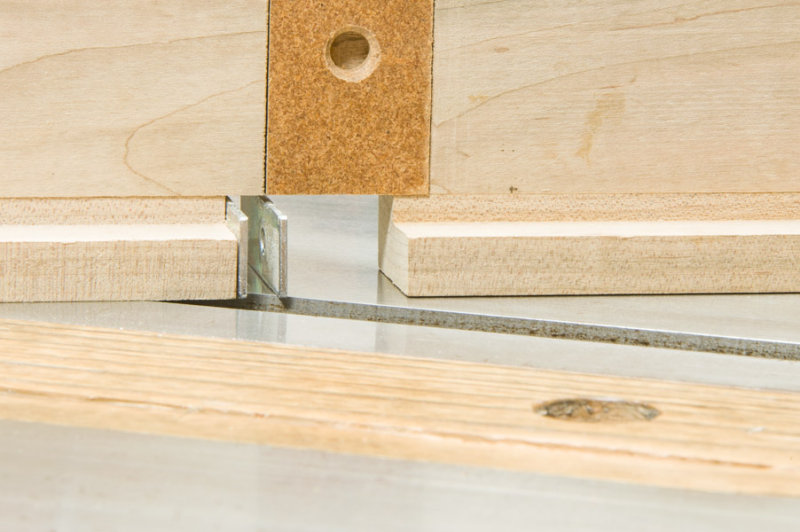
And then it was time to test it all with a brand new Freud SBOX8 Box Joint Blade Set. This was really the whole reason I'd built this jig. What a bust this turned out to be. And you can see why in the photo below.


The blade set consists of two blades with flat tops that are supposed to be able to cut either 1/4" or 3/8" fingers. The 1/4" cuts were perfect, but the 3/8" cuts were badly misaligned. The gap seen here is a little over 1/32" and completely unacceptable. So I'll return the blades next week for a full refund. I don't think I even want to try this with another set and will use either my router with the new jig or my existing dado stack. Testing with those will happen this weekend. It's too bad the dedicated Freud system didn't work. But I can't keep it the way it is.

Thursday, April 3, 2014

A Box Joint Jig II

Tonite was night two of my box joint jig build, and because I only needed to fire up the table saw once I was able to work later and got a lot more work done. Most of tonite involved drilling holes with the drill press... including a few not really needed. :)


At the end of the evening I had most of the work done. I also had to recover from a couple of errors. I modified the size of the two sliding sections on the back so I wouldn't have to trim both sides of both "L" brackets. But then I used the plan dimension to center the hole in the sacrificial pieces. It didn't take long to discover the wing screw on the back wouldn't allow the sections to slide their full length. So I plugged the hole and redrilled it higher, and modified all the pieces to fit. They kind of look like hell as a result, but what the hell... they get chewed up anyway. And it's a jig for crying out loud.


The shot above shows the "L" brackets that size the finger width. The bottoms of the brackets did have to be trimmed so they would terminate at the front of the fence.


But on the back I sized the sliding blocks so I could use the full 4-inch height of the "L" brackets and not have to trim and redrill them. But I forgot about the hole for the sacrificial fence, and that's where the trouble started. You can see my plug where the original hole was. Now I understand why they weren't the full 4 inches tall to begin with.


The only thing left for tomorrow night is to drill and install the adjustment screws that fit on the end of the sliding section. The small panel that supports this was cut from a 1/4 inch thick section of Brazilian cherry I had laying around. It was already the correct width so getting it to the proper length was why I fired up the table saw. If it had been later I would have just cut it by hand. Once drilled out the screws will fit into inserts, and I'll use the little right angle support jig to help with that since those holes need to go fairly deep.

More then.


Tuesday, April 1, 2014

A Box Joint Jig

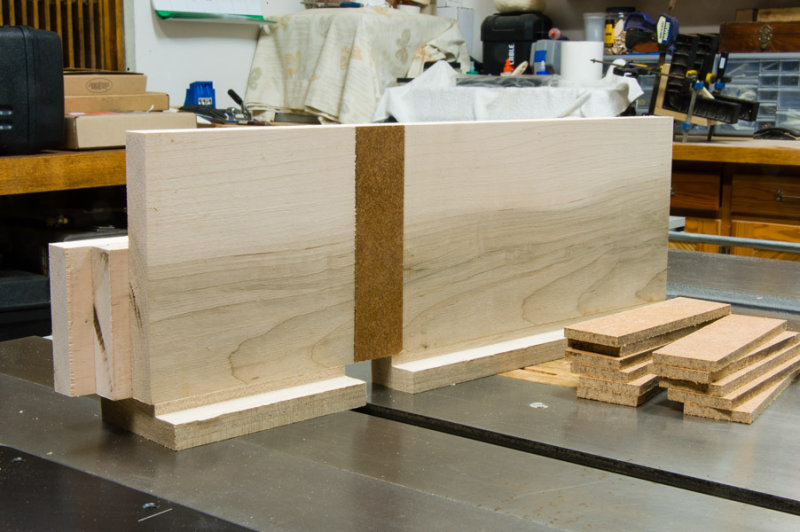
I started building an adjustable box, or finger, joint jig last night. I've wanted to make one of these for a long time but just never got to it. My work hours still are pretty limited in the evenings as to when noise is acceptable in the 'hood', but eventually I can still get things done. So far I've managed to cut the basic parts and fit them. The bulk of this jig will be made using maple. The sacrificial fence sections... and I cut a bunch of them for future use... are simply 1/4-inch hardboard.


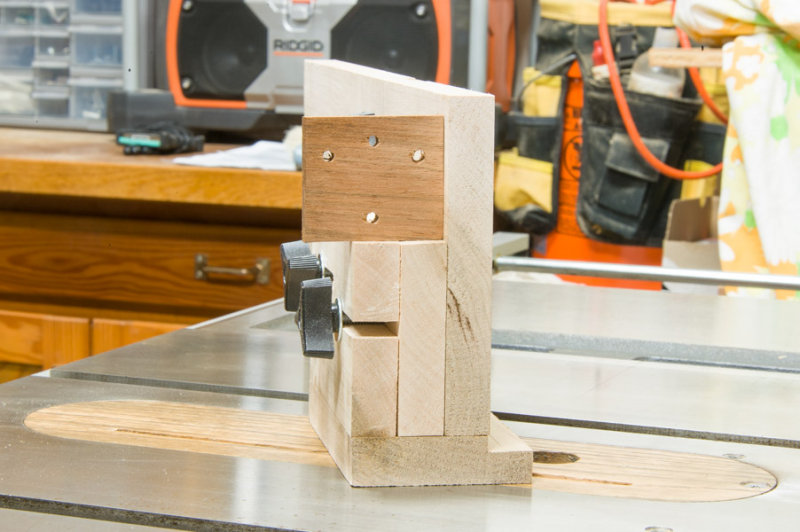
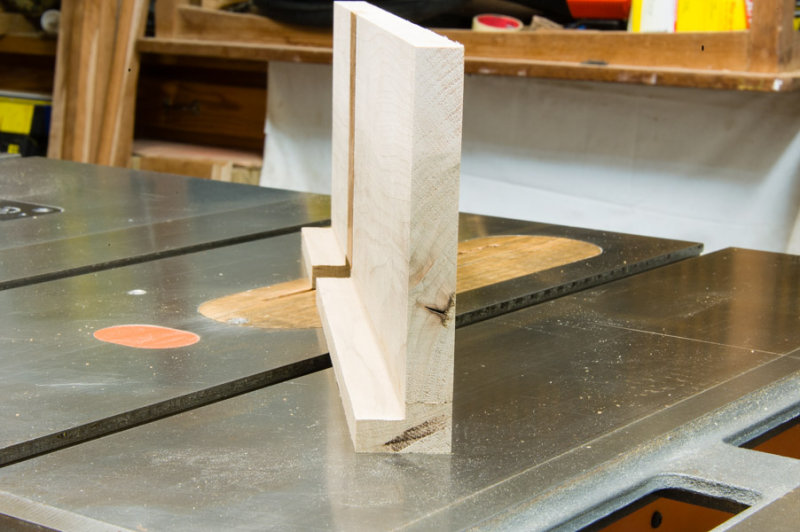
The right side of the fence and shelf shown above will be glued together as one piece. The left side will form the adjustment assembly and slide freely to regulate the finger width.

The back right side of the jig here shows the pieces that will form the adjustment assembly. After I photographed this I realized the vertical pieces were reversed. The shorter piece is the same length as the shelf section, and the two will be glued together to form one unit. The longer piece will then be sandwiched in the center behind the fence and serve to adjust the finger width. The next step will be to cut slots in these pieces to allow them to move back and forth. I'm not sure yet if I'll try and do this with the router or simply drill and file them. But I've laid everything out for the next night of work.

I also built a little right angle jig (not shown yet) to aid in drilling into the end grain of the adjustment pieces. I'll probably post that shot "in use" along with why I need to drill into end grain.


I managed to get a nice match between the bottom shelf section and the width of the fence. But it took a couple passed thru the thickness planer to get it. :) I've had a nice pair of Freud box joint blades for some time... but never used them because I didn't have a jig setup. But the plans and hardware to build this setup came a week or so ago and that put the heat on, so to speak. And speaking of heat... I don't work with maple much. And it has a strong tendency to burn if you don't get the feed rate thru the saw just right. It's pretty obvious that I haven't got that worked out yet. :)

More to follow as I continue this fun little build. I was sooo tempted at one point to buy the Incra rig. But this should be just as nice and save me a bundle of coin in the process.