Showing posts with label Equipment. Show all posts

Friday, July 18, 2014

Porter-Cable 7518 Router Base Recall


Well, Porter-Cable really is taking this router base recall thing seriously. My replacement base (the one on the left side of the photo above) arrived in the mail today! I wasn't expecting to see it until the end of next month! The base on the right was never actually used in a hand-held mode because I originally purchased it for use in a portable router table. Now the motor unit lives in my table saw lift station. But it's nice to know that the whole kit can be used hand held or resold at some point as a completely safe item.

In case you're just reading about this for the first time be sure to visit the US Consumer Product Safety Commission's webpage concerning the Porter-Cable Recall and submit your information for a replacement as soon as possible. Porter-Cable recalled these bases early in July 2014 because the uninsulated handles present a potential shock hazard. Routers are inherently dangerous power tools to begin with, but the idea of getting electrically shocked while using one kinda makes my skin crawl. Once you get your new part throw the old one in the trash and send in the postage paid "Recall Corrective Action Acknowledgement" card. The new bases come with a new base plate, so you'll have an extra if you save the original. You can save the locking screw from the old one too before throwing the rest away. Just be sure the old base gets into the landfill where it can't zap anyone ever.

This recall affects all of the following: Porter-Cable 7518, 7519, 7519EC and 22-7519-60 Routers, 75361 base units; and the DeWalt DWP7518 Router.

Safety First out there!

Saturday, March 1, 2014

Woodpecker's New Corner Jig


I've never purchased any of the specialized Woodpecker tools, although some of them have been tempting. This one is really tempting... but the cost is a bit steep. It's too bad it won't be available to purchase in more affordable increments. I might definitely think more seriously about it then.

Wednesday, November 13, 2013

Pixelstick Light Painting


Have you ever tried light painting a photograph? Have you ever wanted to? If you have a few hundred bucks burning a hole in your 2013 Christmas gift budget a couple of enterprising Kickstarter guys have something that just might just take your photography, "I'd like to be able to do that", wish list to a whole new level.

Deadline for ordering now is Dec 13, 2013. Estimated delivery is May 2014. Every Kickstarter project is a risk, but I've been involved in five (5) so far and every one has delivered exactly what I expected. YMMV.

For more information be sure to visit the Kickstarter pixelstick - Light painting evolved webpage.

Monday, February 25, 2013

Router Switch Done

Router safety switch - final mount
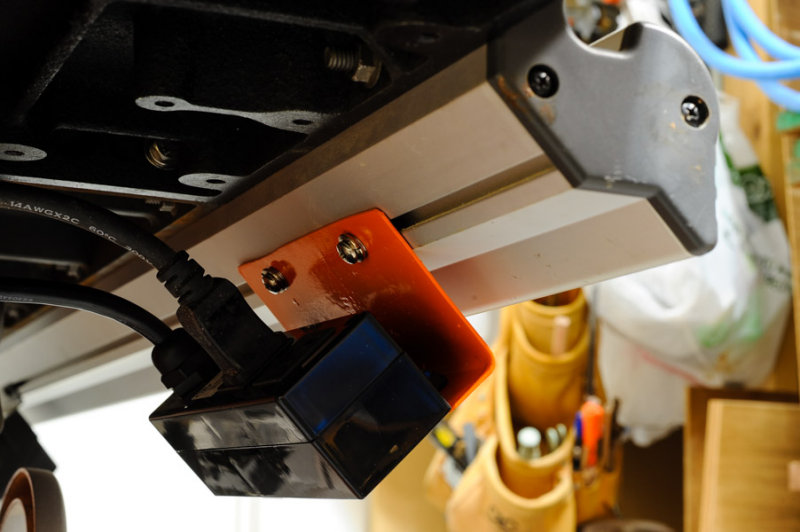
Tonite I finally had time to finish mounting the router safety switch on the table saw the way I like it.  The first mount hanger I fabricated was too small and the material too light, but it proved the concept.  (See A Day in the Shop)  So I rebuilt it using a larger piece of steel and a thicker gage.  It was more difficult to cut, bend, and drill this way, but well worth the time and effort.  I also slathered a couple coats of paint on it to keep it from rusting.  This one doesn't budge when touched.  So it's a keeper.
Much more room for a screwdriver!
I also installed a hook on the side of the saw cabinet to hang the router and safety switch cords on.  This will keep them off the floor and out of the way.  I bought two hooks like this, one for each cord, but if just this one works I won't bother putting the other one on.  We'll see over time.
Cord hook
The only thing left to make this a fully functional router station system is to build the fence.  And that's about to happen soon.  The final coats of finish are on the tables now and they're just about ready to transport to the office.   Tonite I put a coat of wax on them and installed the mounting rails on the cpu cabinet.  All that's left is to flip the main table and install the cpu cabinet sliders on the underside and the shop will be mine again!  It'll be nice to get the truck back inside at night.
Cord hook at work
I'm not much looking forward to the installation job at the office... but that's another story for another day. :)


Saturday, February 9, 2013

A Day in the Shop

Finishing work started on the office build work tables last night.  My neighbor helped me hoist them up yesterday after work.  I'm starting on the undersides with a light coat of Watco oil and polyurethane satin and not get too carried away... this part of the project will never be seen.  By tomorrow they'll be ready to flip over for the real work on the exposed surfaces.  I like wipe on finishes, and this will be no exception.  Everything is cut almost 1:1 with either mineral spirits or naptha.  It means a slower build, but much easier work.

There was also time today to fabricate a mount and install the router safety switch.  The mount is nothing more than a piece of sheet metal cut in a 2"x4" rectangle, drilled to take screws, and bent to attach to the rail of the table saw.

If I had this to do again... and I might at some point... I would use the next thicker gage of steel.  The piece I used was just a little bit light.  That made it easy to drill and bend, but a little more "bendy" than I'd like it.  We'll see how it works over time.

While at the home center I also found a a hook (not shown) that looks like it might work well with a little modification to hold excess cord lengths.  It even came with Rigid orange plastic covering!  I'll figure out a way to attach it to the side of the saw somehow. More drilling steel... seems I've been doing a lot of that lately.
There was even time to spare this afternoon, so I cleaned out my messiest small parts and hardware drawer and organized a lot of the pieces into a new 22-bay small parts drawer set.  Each drawer now holds something.  I need to get a similar storage unit now for screws!  The drawer still needs help!

It was a good day out there today!  A lot got done.and it's always relaxing.

Oh, and how could I forget this today:


Gong Hey Fat Choy!

Saturday, December 15, 2012

TS Repair Pau

All together again!

Today was the day to finally complete the table saw repair.  The major part of the work was the removal of all the miscellaneous parts... things like the rails front and rear, the motor, and the base section.  That provided access to the arbor assembly where I could unbolt it from the table top and rethread the screw that rotates the blade for bevel cuts.

Thursday, December 13, 2012

Table Saw Repairs

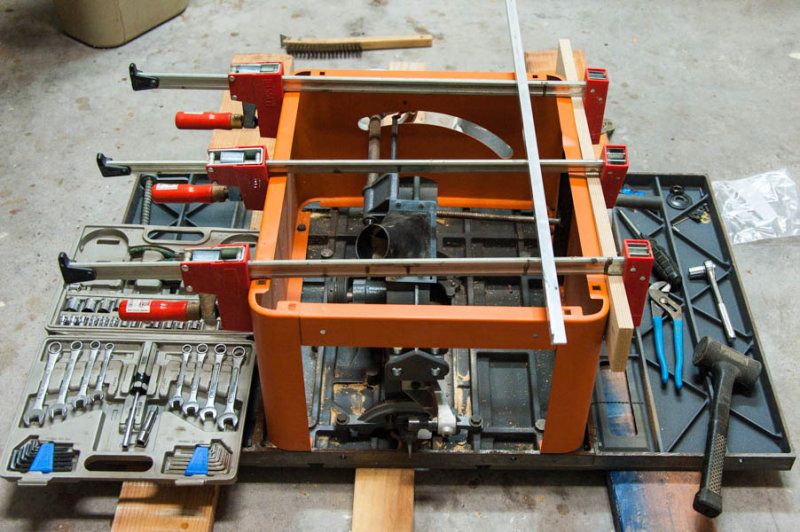
Table Saw Inverted
A week or so before leaving for AU this year (more on how that all went in a future post) my trusty Rigid TS3650 table saw broke down.  It has worked flawlessly since it was new 10 yrs ago, but time caught up and the doctor needed to make a call.  What actually happened was that the threaded rod that rotates the arbor for bevel cuts popped out of its "catch" in the arbor assembly.  What I hadn't really noticed over the years was that the sheet metal siding was slowly being pushed out of shape, and the additional length inside the assembly finally wasn't enough to keep the rod in place.

Sunday, July 22, 2012

Shooting Fireworks

(Click for an even larger view)
You never know when you might see a fireworks show. It could be on the 4th of July in the USA, Bastille Day in France, Chinese New Year in Hong Kong, or after the Friday luau at the Hilton Hawaiian Village in Waikiki, Hawaii. Whenever it happens if you want to take good photos of it you need to know how. You can watch videos on YouTube, find a magazine article, or go on a Google search and end up here. Shooting fireworks effectively is the topic this week.

Thursday, October 6, 2011

Gear

Benro C0190T Fold Flat Tripod
Benro C0190T Fold Flat Tripod.
I'm done going on long trips and not having a functional tripod with me for night or low light shots.  Or phrased another way, I no longer want to haul my expensive and heavy Gitzo tripod when I go on trips.  What I've wanted was something small enough to fit in a carry on bag, light enough to haul around with the camera bag, but high build quality.  I think that describes the rig above.  I'd never heard of Benro before ordering this, but I'm impressed. 

The specs are as follows:

Top Plate or Base Plate Diameter1.9 in
Maximum Load13.2 lbs
Folded Height16.1 in
Maximum Height52.0 inches
Leg Sections5
Leg Lock TypeTwist Lock
Head Mount3/8-16
Foot MountAdhesive
Foot TypeFixed Rubber
Foot Size9 mm
Weight1.54 lbs / 0.70 kg

Leg construction is carbon fiber.  The unit is light, and not something you'd want to walk away from if you've mounted an expensive DSLR on it, but perfect as a travel unit you'll likely babysit.  The kit also included a two section center post, nylon carrying bag, and a special servicing wrench.  The fold flat leg feature is unique and perfect for saving space in a suitcase.

The first real test of this will be at the end of November during my Autodesk University 2011 trip to Las Vegas.

Saturday, October 1, 2011

PAPIs Explained

So what exactly is a PAPI?  A PAPI is a Precision Approach Path Indicator, a visual aid to pilots that allows them to maintain a proper flight angle into a runway.  A PAPI is a very simple mechanical system that uses red and white lights to tell a pilot if he's too high in his approach, or too low.  

Outside PAPI unit